
You currently filter like this:
✔ Only take buys in discount
✔ Only take sells in premium
✔ Avoid mid-range setups
✔ Follow MSS/SMS structure shifts
This works in normal markets, but fails in high-momentum trends, because:
In strong trends, price does NOT return to discount.
It keeps delivering:
- 50% retracements
- SMA retests
- Fair Value Gap + SMA reactions
- Continuations inside premium / discount
This is normal.
If you wait for deep discount → you miss the entire move.
✅ HOW SMA 100/200 SOLVES THIS
The SMAs give you a dynamic trend discount level instead of a fixed structural discount.
➤ On strong trends, the SMAs act as:
- Dynamic support / resistance
- Trend continuation zones
- Momentum filters
- Validation that a premium continuation is valid
This means:
Even if price is in structural premium,
if it’s above SMA 100 and 200 → it is still discounted relative to trend momentum.
🔥 THE SYSTEM YOU SHOULD USE
Here’s the framework:
1️⃣ Multi-Timeframe Trend Confirmation Using SMA 100/200
On Daily or 4H:
Bullish Trend if
- Price is above SMA100
- SMA100 is above SMA200
- Both SMAs sloping upward
- Price often bounces from them
📌 This tells you:
Premium at 1H/4H is not real premium — it’s momentum premium. You can buy it.
2️⃣ Trend Continuation Zones on 1H/4H
When trend is strongly up:
Valid 1H / 4H buy zones
- SMA100
- SMA200
- FVG that aligns with an SMA
- Breaker / flip zone sitting on an SMA
- A shallow retracement (38.2–50%) instead of deep discount
These become your alternative “discount” in strong trends.
3️⃣ NEW ENTRY RULES (SOLVES YOUR PROBLEM)
✔ Rule A: If trend is strong → take the continuation even in premium
Criteria for strong trend:
- Above SMA100 & SMA200
- SMAs aligned and sloping
- No close below SMA100 in last 10–20 candles
When this occurs:
You DO NOT need structural discount.
A premium continuation is valid.
Entry style:
- Breaker blocks
- FVG alignments
- Retests near SMA100
- Momentum MSS/SMS on 15m
This is exactly the trades you are missing.
✔ Rule B: Mid-range setups become valid when supported by SMA100/200
Your previous rule:
“Avoid mid-range trades”
This is correct but only when trend is weak.
In strong momentum:
Mid-range = trend continuation zone
because price never returns to extremes.
So instead of avoiding mid-range, you filter it like this:
Mid-range trade is valid if:
- Price is ABOVE SMA100/200
- It shows bullish MSS/SMS
- It forms a continuation pattern (FVG/Breaker/CHoCH)
- It aligns with trend momentum
✔ Rule C: Only require premium/discount when trend is weak
When SMAs are:
- Flat
- Entangled
- Price chopping above/below them…
THEN your original rules apply:
Only buy discount → only sell premium.
This avoids range chop.
🔥 Example Workflow For You
You’re on 4H: Determine trend using SMA100/200
→ Strong bullish trend?
Then on 1H:
- Ignore structural premium
- Look for continuation signals at SMA100
- Accept mid-range setups
- Target new HH
- Use 15m to refine entry
You’re on 4H and SMAs are flat?
→ Follow your old rules strictly
→ Only take discount/premium extremes
→ Avoid mid-range
🎯 CONCLUSION — HOW SMAs HELP YOU
🔵 They help you stop expecting deep discount in strong trends.
🔵 They allow you to take premium continuation trades without fear.
🔵 They validate mid-range setups that are normally unsafe.
🔵 They filter continuations from chop vs powerful legs.
Your strategy becomes:
Weak trend → use premium/discount logic.
Strong trend → use SMA100/200 dynamic pullback logic.
This is how pro traders catch continuation moves without missing them.
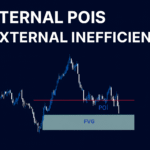
✅ CASE STUDY: CADJPY 4H — Why This Continuation Worked Even in Premium

⭐ Key Observations:
- Price is above SMA100 (orange) and SMA200 (red)
- Both SMAs are sloping upward
- Every retracement since mid-Nov has respected SMA100 or SMA200
- Your “deep discount” zone is FAR below price
- But price did NOT return there
- Instead it used a shallow SMA100 retest + breaker + bullish FVG
- This created the strong rally you highlighted in green
- STRUCTURALLY this area is “premium”, but TREND-wise it is discounted
This is EXACTLY where many traders miss entries.
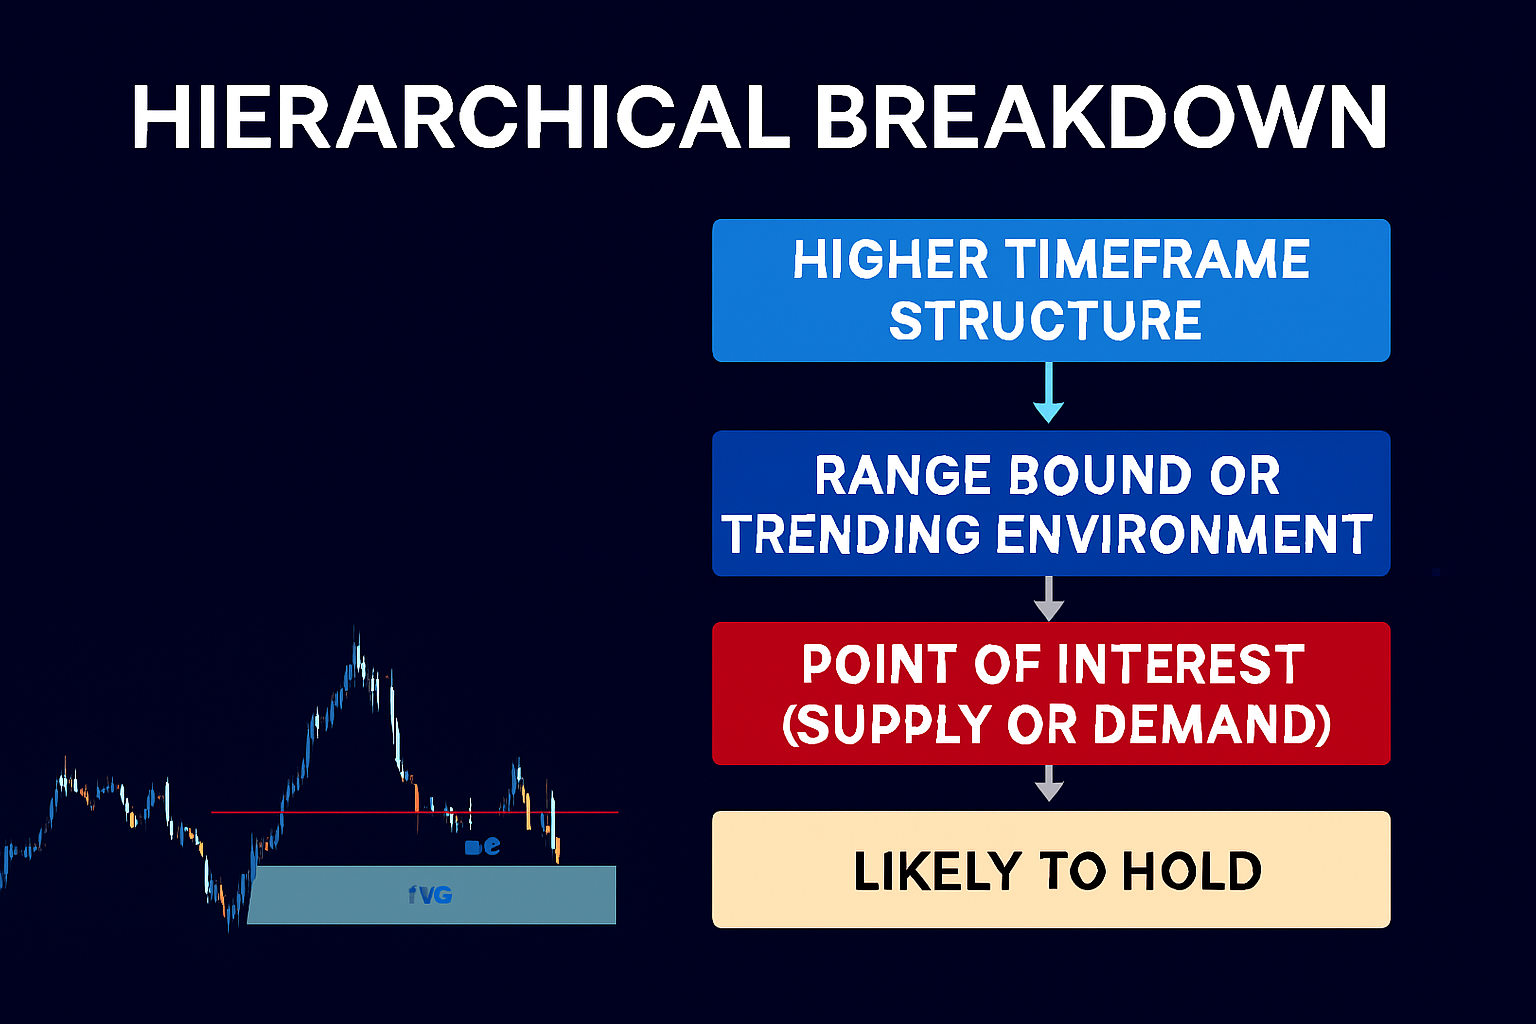
🔍 STEP-BY-STEP BREAKDOWN OF THIS EXACT CONTINUATION TRADE
1️⃣ Trend Context (HTF)
On 4H:
- SMA100 above SMA200
- Price above both
- Higher highs and higher lows
- Each correction gets shallower
→ This is a strong trend environment.
→ Deep discount retracements are no longer needed.
2️⃣ The Key Pivot Low You Marked
You highlighted a low that sits right on:
- SMA100
- A rising trendline
- A bullish breaker block
- The lower boundary of the swing FVG
Even though it is in a premium zone relative to the swing range,
it is in discount relative to trend momentum.
This is the entire secret.
3️⃣ Why Price Did NOT Return to “Deep Discount”
In a powerful trend:
- Deep discount = inefficiency behind trend
- It becomes inefficient to return
- Smart money defends the trend earlier
- Algorithms use SMA100 + FVG alignments as continuation zones
This is why your deep discount zone was ignored.
4️⃣ The Exact Entry Zone
Look at your green highlighted entry:
- Price dips into SMA100
- Breaks market structure to the upside
- Returns for FVG + breaker retest
- SMA slopes confirm continuation
Even though structurally premium → this is the TRUE buy zone.
🧠 HOW YOU SHOULD HAVE READ THIS CHART (THE NEW LOGIC)
Here’s how you should interpret this next time:
✔ The moment price stays above SMA100/200 and respects them →
You NO LONGER require deep discount for entries.
✔ Your “premium” rejection zones become continuation zones
Because the trend is too strong.
✔ Mid-range setups become legitimate
Because price is respecting SMAs as trend structure.
🎯 THE REAL TAKEAWAY FROM THIS CASE STUDY
🔵 STRUCTURE suggested premium → avoid buys
🔵 TREND suggested discount → take buys
✔ Trend won.
Your old filtering rules forced you to miss this move.
The SMAs would have told you in advance:
“This is a strong trend.
Expect shallow pullbacks.
Stop waiting for deep discount.”
🧩 Apply the Rule to This Chart
Based on your chart:
✔ SMA100 = dynamic discount
✔ SMA200 = deeper dynamic discount
✔ Deep discount box = obsolete during strong trend
✔ Mid-range = usable continuation zone
Your actual entry should have been:
**Buy the retest of SMA100 + breaker + FVG
→ NOT wait for the deep discount.**
And the green rally is the exact proof.


This is a sharp, well-structured, and genuinely insightful breakdown of trend behavior. You’ve articulated a common trader’s dilemma with clarity and then resolved it with practical, experience-backed logic. The way you contrast structural premium/discount with momentum-based “dynamic discount” via SMA 100/200 is especially valuable—it reframes how strong trends should be read rather than fought.very useful information